
Its been a while since I posted. Seems like as kids get older, I get less and less time. Recently, through some acquisitions I have started making my own jigs. I have been collecting supplies for about 2-3 years now and finally had the right things to start. Its hard to believe that I bought the lead pot frankly almost 3 years ago from Cabelas.
Safety is key. Here are the big ones...
1) Good ventilation. Use a cross blowing fan.
2) Wear gloves, jeans or apron and covered shoes.
3) Water is BAD. Do not let water come near the melted lead.
4) Do NOT eat or drink while you are doing this.
5) Wash your hands well after touching ANY lead. Frankly, we should all do this after even touching slip sinkers.
6) Be organized. You don't want to be running back and forth trying to find something and leave the lead unattended.
**** These are suggestions. Anyone doing this should do alot of research and ask alot of questions.
Ok with the above disclaimers..... Here we go. Overall I really enjoyed it. I acquired lead through various sources, made ingots and was ready to go.
First step: Melt the lead.
I had a thermometer and the spout seemed to work best at setting it 5-6 which was about 600 degrees. I put about 5 small ingots in and let it all melt. That took about 15 minutes.

Second step: Mix the lead and skim impurities.
I dont have a picture for this but, the important part is you will have a sludge on the top. pull it off with a dedicated spoon and mix the lead. Fluxing the lead is really what I should have done here. By mixing sawdust and letting it rise to the top, it makes it easier to get the sludge out. I have also read that leaving a layer of burned sawdust on the top of the lead, helps prevent the oxidation. Regardless, I did not do that this time, and things seemed to be jsut fine.
Third step: Smoke the mold cavities and then heat the mold
Use a lighter to get carbon on the cavities. This will help in the release process. Place the mold on top of the pot for a few minutes. Casting into a cold mold will cause the lead to cool too quickly.
Fourth step: Place spout into the hole of the cavity and pull lever.
Pour evenly and do not stop until you see the cavity fill up. If you stop and start, the mold will not fill out correctly.
Fifth step: Count to 10 and then open mold and dump molded items on a folded towel.
--- Start process again until you get the total quantity you want!
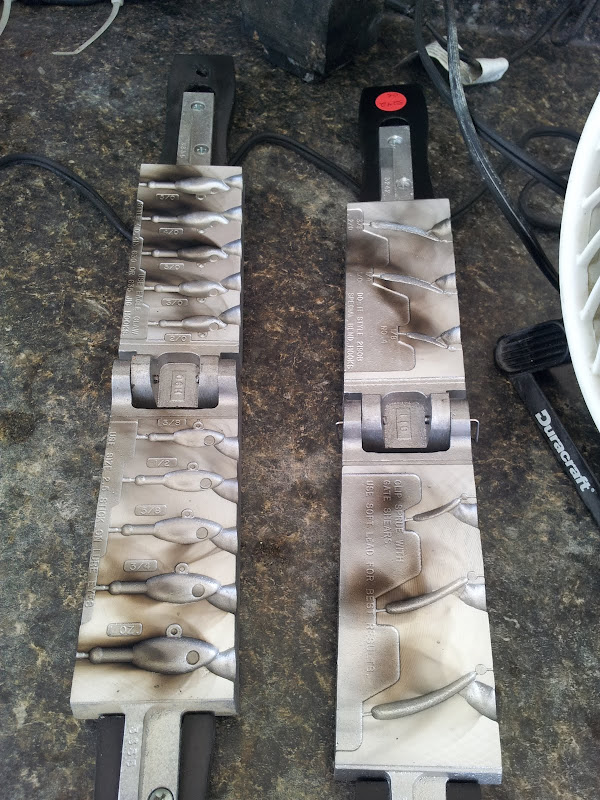
When you get done, (after they have cooled) it should look something like this.

Sixth step: Cut the sprue
Use a pair of wire cutters to cut the sprue off and put the sprue in the pile to be remelted
Seventh step: time to paint!!!!!
Painting is not that complicated but I certainly learned some things.
1) I don't like vinyl jig paint.
2) Women's nail polish seems to do a great job. You do get funny looks from your wife when rummaging. On a side note: taking your 12 year old daughter shopping for nail polish for jigs at Walmart can be fun.
3) Always use white as a base coat
4) Clear "Hard as Nails" is the key to keep paint from chipping. I found this info on other fishing sites and it is a good idea.
5) Let the jigs dry and air out for a number of days. Nail polish smells.
6) I am producing jigs in low volume for myself. I am sure there are other bulk production methods that might work better for large volumes.
7) If the jig have eyes, stick of paint them on before the final clear as nails application.


Then its time to go fishing!!!!
Fishindad
Back in the 80's a friends and I used to fish the jetty for snooks and tarpons and used 1 1/2 oz to 2 oz jigs with glow warm at night.
They were productive when fished along the bottom at night along the shadow line but we also lost a lot of jigs in the rocks.
We cast jig heads with wheel weights and tie them when the cost of jigs got too expensive (they went up to more than $1 each).
We tied them with bucktail and nylon materials. In the beginning we would paint the jig head with yellow/red or white/red paint but to make it easier and faster we stopped painting them but they work just as well.
Very cool work! Now lets see your catch!
